Maybe I should stick to software...
A story about bricking some hardware, then encasing said brick in a large concrete slab.
People generally only publish their successes and with fairly good reason – For the publicity, reputation and possibly to impress prospective employers. Conversely, for the opposite reasons no-one wants to broadcast to the world “Actually… I failed miserably at something.”
I believe it’s good to talk about our failures as well as our successes, if for nothing else but reflecting on what went wrong in order to learn from it (Or in this case… Hopefully have someone point out what I did wrong). So, when I completely bricked my brand new IP Camera I thought about quietly sweeping it under the rug and pretending it never existed, but instead decided that perhaps I could turn it into a somewhat light-hearted story.
Our story begins with the purchase of an IP Camera...
- The username and password to the camera’s web interface.
- Username and password of email accounts configured for alerting.
- Access which allows me to recover the root password of the camera and gain access via telnet.
Awesome.
Note: I have reported the above vulnerability to the vendor and will not be exposing any technical or identifying details until I am satisfied that either it has been fixed, or the vendor has no intention of fixing it. The rest of the article may not be considered to apply to this camera in particular.
After a lot of thinking, I started investigating methods of compromising an IP camera in order to circumvent any firewalls and gain access to the local network behind it. After obtaining the root password to the telnet interface getting shell access, I had poked around enough for my satisfaction and had a thought: What if I could push my own evil firmware to it?

So, I started to investigate the firmware update mechanism and was able to download and store the latest firmware from the vendors website. The firmware update is simply a JFFS2 partition, with some custom metadata at the start of the file (Version information, MD5 hash of the image, etc). I mounted and extracted the image on my machine, made a simple change and packed it up into a new JFFS2 image, then added the header information which was copied from the original file (At this stage I was unaware of the MD5 checksum).
Throwing my new update at the camera just resulted in it complaining about the hash value being incorrect. Fine, it must verify the integrity of the file before applying. So I start searching for a hash somewhere in the update file.
The hash isn’t immediately obvious, but surely it has to be in there somewhere.
Examining the procedure undertaken to apply the update file, it becomes apparent that the MD5 checksum is taken of the actual JFFS2 image without all the stuff in front of it, which makes finding the hash easier when I have one to compare it to.
As it turns out, the MD5 hash is stored as little endian in the header information before the JFFS2 image.
- Modify the checksum to match the new image.
- Throw update at web interface again.
- ???
- Profit!
It seems promising right up until the interface returns “Same file version!” A-ha! Another verification, clever camera. No matter, the update header also stores versioning information so simply decrementing that version slightly (does that make it a downgrade?) and trying again works a treat.
Load firmware update -> Mash the button.
and… Success!
It accepts the update, and my telnet window starts scrolling by with a bunch of stuff about erasing the flash partition and preparing to write the new image… Unfortunately, this is when my mistake finally dawns on me – I watched in horror as I realised I may have set the wrong erase size in my haste to recreate the image. I take a sip of my beer and quietly hope the firmware update does not auto-reboot and I can fix it via telnet… But then it reboots…
I nervously await the connection to my netcat listener to hand me a reverse shell and exclaim just how awesome I am, but…. Nothing.
I crack open a new terminal tab and start pinging the address it was on…. Nothing.
Dammit.
“No worries!” exclaimed I, “I’ll rip this sucker open, there has to be a UART on it somewhere”
So I start to pull the thing apart, which is remarkably easy. Everything seems to be quite well laid out with the glass lense simply unscrewing and everything just sliding out. The camera is made up of four PCB’s stacked on top of one another:

The only problem, of course, is that none of the pins are labelled, which means I’m going to need to go to a little bit of effort to find the serial RX/TX pins. Lacking an oscilloscope, the next best thing is to use a multimeter to identify the most likely candidate for the boards TX pin, which will probably be fluctuating between 0 and 3.3V. Poking through all the test points closest to the SoC didn’t yield anything, until I flipped it over and tried the test points on the reverse – Success! One of the pins is jumping around all over the place. So I plug in my USB <-> UART board, make an educated guess at the baud rate and hold a wire on the test point after giving the board power.
High-fives all ’round, we have console!
At this point I need to identify how the flash is laid out so I don’t go blundering in and overwriting stuff that I don’t want overwritten (Is it possible I’m learning from my mistakes?). Luckily for me the Linux system does actually start to boot and the kernel spews the partition map out to console:
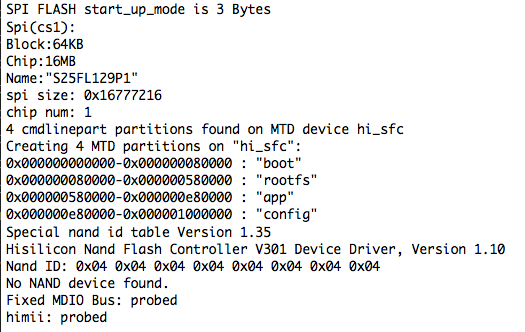
No problem – the ‘app’ partition is what I’m after, since that’s the one that I managed to mess up and the contents of the firmware update from the vendor contains everything that was in that partition. At this point I’m thinking to myself “You know? This seems pretty straightforward”:
- TFTP the image into RAM.
- Erase address
0x580000length 9000. - Write contents RAM address of firmware to
0x5800000. - Reset.
- Success!
I finally have a cunning plan. So, I power-cycle the device and mash the enter key a few times to drop into the U-Boot prompt. From there I can set an IP address and TFTP the update file (Stripped of the header stuff, so it’s just a JFFS2 image) which is copied into RAM address 0x80008000.
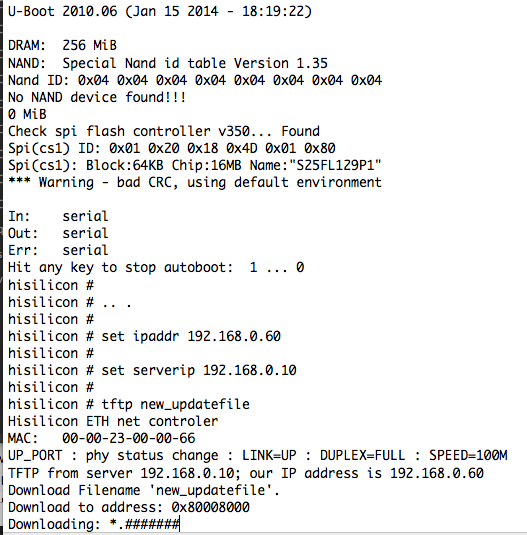
Checking and double-checking the addresses because I don’t want to overwrite the bootloader, I erase and rewrite the ‘app’ partition by executing:
> sf erase 580000 9000
> sf write 0x80008000 0 0x580000
Image has been written! Now the moment of truth – I type ‘reset’, mash the enter key, and…..
Nothing. Again.
I’m getting used to seeing a whole lot of nothing.
Maybe, for some bizarre reason, it halted the CPU instead of resetting it? So I yank the power and plug it back in… Nothing.
No signs of life at all, the system appears to be totally bricked.

Maybe I should stick to software hacking and avoid breaking more hardware.
The chip has a JTAG interface, but it doesn’t appear to be broken out onto the PCB, so that doesn’t help me. Perhaps I can clone the flash chip from a known good one? Maybe that will be next in this saga.
I’m not entirely sure how I managed to go so wrong there – I double checked my addresses and to me they seem correct. If anyone can tell me how I broke it, or has any suggestions to fix, please let me know.
Update: I’ve ordered a test clip which will hopefully allow me to interface with the flash chip in-circuit… Provided that is the issue here.